WhatsApp:
+86 18866361895
WhatsApp:
+86 18866361895
Steps for using pesticide residue detector1. Startup processConnect the power supply of the pesticide residue rapid testing instrument, preheat it, and convert the computer output ···
 在线咨询
在线咨询
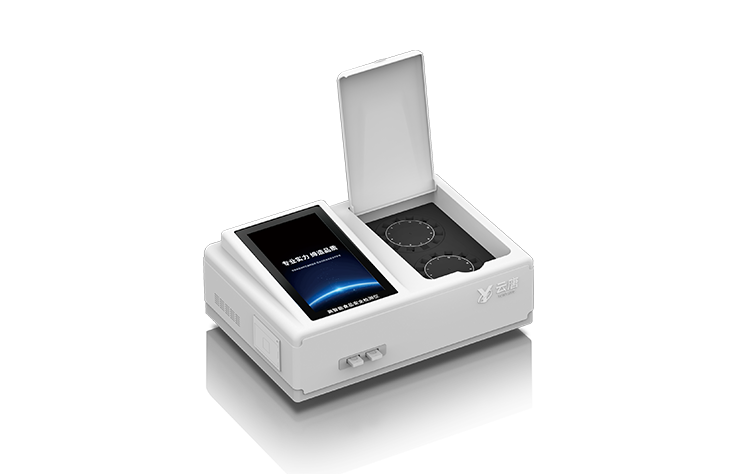
Steps for using pesticide residue detector
1. Startup process
Connect the power supply of the pesticide residue rapid testing instrument, preheat it, and convert the computer output mode to printer output mode.
2. Comparison test:
① Take one colorimetric dish, add 100ul enzyme solution to the dish using a 100ul micropipette, and then add 2.5ml buffer solution to the dish using a 10ml pipette and shake well.
② Use a 100ul micropipette with a replacement pipette head, add 10ul of color reagent, and then use a 20ul micropipette. After adding 20ul of substrate, seal with plastic wrap or clean glass and shake well.
③ After pressing the "100%" button, place the colorimetric dish in the upper channel of the instrument, close the instrument cover, press the "Control" button, and after 1 minute, the change in absorbance of the control will be displayed.
3. Sample extraction:
① Cut 1g of the sample into small pieces and soak it in 5ml of extraction solution for 10 minutes (if equipped with an oscillator or ultrasonic waves, the time can be shortened to about 2 minutes)
② Take 2.5 milliliters of soaking solution, 100 microliters of enzyme, and 100 microliters of chromogenic reagent (cultured at 30 ℃ for 15 minutes), shake 100 microliters of substrate and pour it into a colorimetric dish before placing it into the instrument.
4. Sample testing:
① Place the colorimetric dish into the instrument and press the "Sample" button for testing.
② Print the inhibition rate of pesticide residues in the tested vegetables.
What issues should be noted during the food safety testing process?
1) During the testing process, the reaction bottle, micropipette, pipette, etc. should be cleaned thoroughly; Especially clean immediately after use and dry in a non polluting place (such as filter paper, pipette holder, etc.);
2) Use different instruments for different reagents, adhere to the use of specialized instruments, and label them with specialized labels;
3) The amount of enzymes, colorants, and substrates added should be accurate, and they should be shaken well after addition;
4) When holding the frosted surface of the colorimetric dish by hand and placing it in the instrument's colorimetric slot, the transparent surface should be aligned with the direction of the light path, allowing the light path to pass through the transparent surface of the colorimetric dish;
5) Operate as quickly as possible. Because the key to enzyme inhibition rate detection is the relationship between inhibition rate and reaction time, inconsistent operation time between control measurement and sample measurement can also result in inaccurate detection results;
6) Before adding enzyme reagents, be sure to heat the culture tank to 37 ℃ to ensure that the reaction bottle can be immediately placed in the culture tank after adding the enzyme solution and color reagent. Remember not to wait for the temperature to rise after adding the reagents;
7) When using a pipette to extract solution, the pressure should be moderate and avoid pressing it all the way down, and the pipette tip should be cleaned in a timely manner.
Why does low enzyme activity occur in lysozyme?
1) The enzyme has been inactivated during transportation;
2) Not shaken thoroughly;
3) During the preparation process, the reagents, distilled water, and pipette were contaminated or not cleaned properly;
4) Improper operation leads to enzyme inactivation;
5) The cultivation time is relatively short;
6) The cultivation temperature is relatively low;
7) The stored temperature of the prepared reagents is too high, causing enzyme inactivation.
Other precautions for pesticide residue detector
1. The preparation of phosphate buffer solution must use distilled water, purified water or mineral water, otherwise it will affect accuracy;
2. Enzyme reagents and substrates should be stored at a temperature of 0-5 ℃ to ensure enzyme activity. Therefore, they should be stored in a refrigerator, but not frozen to ice;
3. After the reagent is sucked out of the reagent bottle, it cannot be put back into the bottle. Adhere to the principle of only sucking in, not entering, to prevent reagent contamination;
4. The last step in the sample testing process, after adding the substrate, should be shaken immediately and placed in the analyzer, otherwise it will affect the accuracy of the data. Through practice, in the testing of spinach samples, the inhibition rate immediately added was 21.4%, and after 1 minute, it was 51.7%. It can be seen that the length of time the reagent is added can affect its accuracy;
5. Leeks, celery, garlic, scallions, and tomato juice contain plant secondary metabolites that can affect enzymes and easily produce false positives. Therefore When dealing with such samples, the method of extracting the entire vegetable plant can be adopted (do not spoil the sample). Similar methods can also be used for vegetables with high chlorophyll content;
6. Biochemical detection method is only a qualitative detection method, which can only detect residues of organophosphorus and carbamate pesticides, and is not applicable to the detection of other types of pesticides.
Do you know how to put the pesticide residue detector samples now? Have you learned how to use the pesticide residue detector? If you have any questions, you can contact Hengmei's online engineers for detailed introduction and answers.

Scan QR code on WeChat